STOP ... if you haven't read
the main
tire-changing document, start there!
|
Removing A Tube Tire
The proper procedure when removing a tube tire is ...
- RELEASE AIR FROM TUBE
Just as with tubeless tires, you need to remove the air from the tire
(or, in this case, the tube) before you can get the tire off. So let
the air out. You do not need to remove the valve core from the valve
stem. Push the valve stem into the wheel through the hole in the rim.
Unlike the tubeless tires, this is typically enough to let you get the
bead off the wheel. But first you have to...
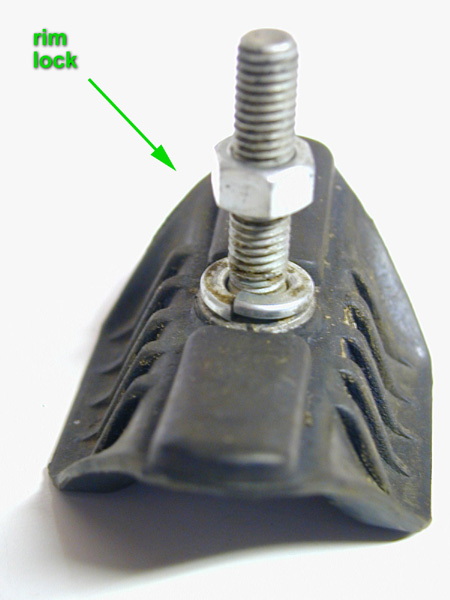
- LOOSEN/REMOVE RIM LOCK
Loosen the rim lock and push it into the tire. The rim lock will look
sort of like another valve stem (or two -- sometimes there are multiple
rim locks), except that, of course, it won't be hollow like a valve stem.
Remove the nut and washer(s), and push the rim lock into the wheel.
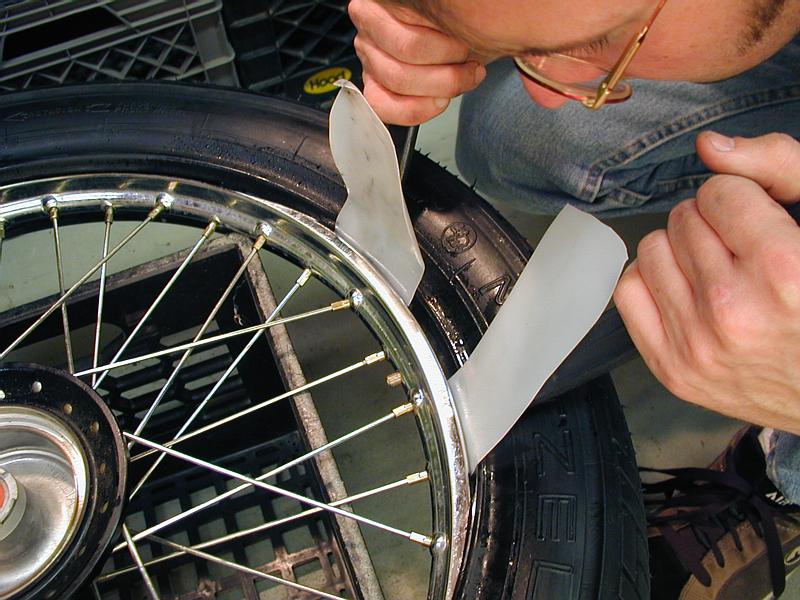
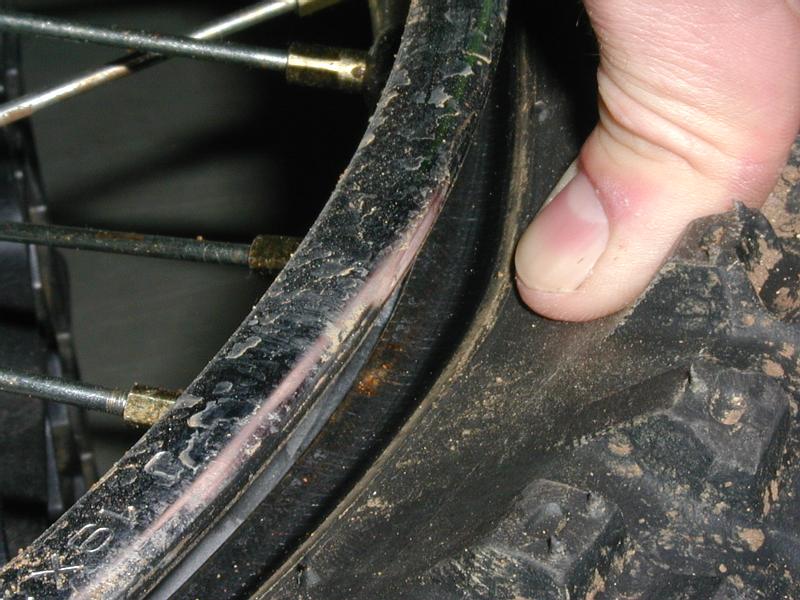
- LEVER/PULL BEAD OFF
Good news ... unlike the tubeless tires, you don't need to apply a massive
amount of force to unseat the bead. Once you've let the air out and released
the rim lock, you should be able to start right in with the tire irons.
Using a
tire iron and a rim protector, and starting reasonably far away
from the rim lock, insert the tire iron into the gap between the bead
and the rim. Pry the bead over the rim, but be very careful not to pry on
the tube inside -- only insert the tire iron the minimum necessary to get
it to hold the bead. Pry the bead over the rim in another location a few
inches around the rim (but, again, not near the rim lock). At this point you
should be able to pull the rest of the bead off by hand, but if the tire
is really tight it may be necessary to pry the bead off in a third location
with a tire iron.
- REMOVE TUBE
Once you get the top side of the bead off,
carefully
pull the tube from the tire, guiding it between the metal rim and the
tire's bead with your fingers. Be gentle with the valve stem.
- REMOVE SECOND HALF OF TIRE
It shouldn't take irons (but it's OK if it does) ... remove the tire the
rest of the way from the rim. You may need to guide the bottom side's
bead past the rim lock, or maybe there's enough space for the rim lock to
bounce around and not be in the way. Never force things.
- REMOVE RIM LOCK(s), RIM STRIP
Once the tire's off you can remove the rim lock (which sometimes
gets stuck/hides in the tire.) And you can remove the rim strip, which
covers the ends of the spokes and prevents them from abrading the tube.
Wipe these down and clean everything up, particularly the inside of the wheel.
You don't want sand or dirt or sharp things in here damaging the tube.
|
|
Mounting A Tube Tire
Mounting a tube tire can be kind of tricky, since there are typically
a bunch of things that all need to be installed in order. Essentially
you do all the steps above backwards, but it can be confusing, so let's
walk through it.
- INSTALL RIM LOCK
The
rim lock
goes on first. Slide it in through its hole, and put the
washer(s) and nut back on the threads, but don't tighten it down yet.
- INSTALL/ALIGN RIM STRIP
Put the
rim strip
on, paying careful attention to where the valve stem hole
goes. Make sure it's centered and covering all of the spoke ends.
- PUT HALF OF TIRE ON
Being careful to clear the rim lock, put the bottom half of the tire
on. You may or may not need irons for this, but it's OK if you do.
- INFLATE/INSTALL TUBE
Put 1 or 2 psi of air pressure into the tube, so it has some form but
isn't
rigid. This will help you avoid puncturing it when you lever the
top bead over the rim.
Guide the
tube into place inside the tire, making
sure the valve stem is aligned with the hole in the rim strip and the rim
itself. Push the valve stem through the hole and screw down the nut that
holds the valve stem in place, but leave it loose for now.
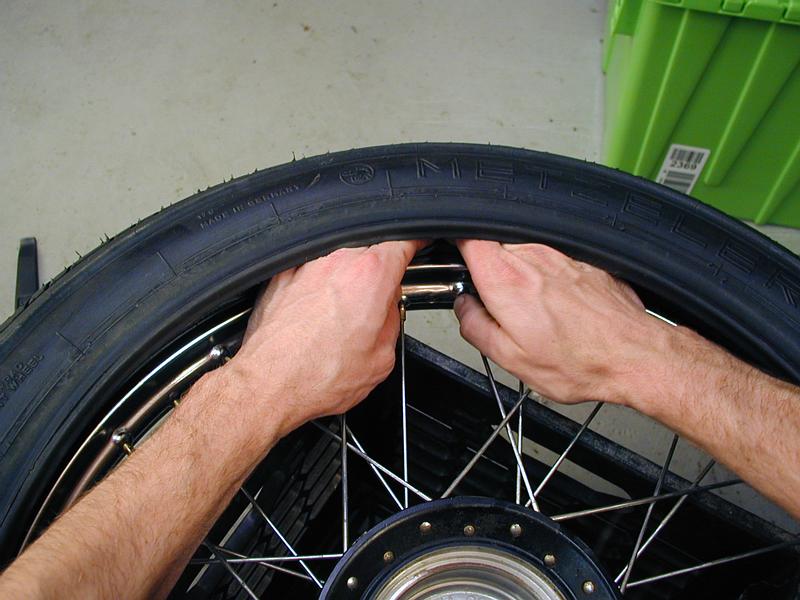
- PUT OTHER HALF OF TIRE ON
Starting opposite the valve stem,
use rim
protectors and tire irons to
lever the top side of the bead over the rim. Alternate back and forth,
and watch the valve stem to make sure it isn't twisting one way or the
other -- you don't want it to have any force on it. As with removal, be
extremely careful not to pinch the tube between the
rim and the tire iron. Go slowly, make
frequent
inspections, and try
pushing down on the sidewalls to make sure that the tube is far away
from the action.
- GUIDE BEAD INTO RIM LOCK
Before you put air in the tube, make sure the tire isn't pinching the
tube anywhere. You might find that it helps to push down on the sidewalls
to push the tube into the inside of the tire. Push the rim lock in a bit
and guide the bead underneath it -- it has to hold the tire from slipping,
or the valve stem could be ripped off. Give both sides of the tire a close
inspection to make sure that the tube isn't pinched and that both beads
are where they should be, and ready to be locked down by the rim lock.
- PUT AIR IN TUBE
Inflate the tube to the pressure you want to run it at. You're done ...
unless you "pinched" (punctured) the tube, in which case you'll hear
air rushing out of the tube (or it just won't hold air) ... you'll need to
need to take everything apart, patch the tube, wait for the patch to
dry, and be more careful next time to make sure that the tube is never
pinched between tire irons and rims, beads and rims, etc.
- FINISHING UP
Tighten the rim lock down to the rim. Don't ask me what a good torque
value is; your service manual should have that info. Also, don't forget
to tighten down the valve stem nut, and reinstall the valve stem cap.
Check the sidewall and wheel rim to make sure everything looks good and
consistent all the way around. If you're in doubt, take things apart and
re-do them, or take them to a pro for advice/assistance.
|
|
Balancing A Tube Tire
Balancing a tube tire is exactly like balancing a tubeless tire, but
rim locks may throw off the balance a fair amount, so prepare to add
a bunch of weight. Dirt bike tires don't need to be balanced, but
any street bike with tube tires should definitely get its wheels
balanced. Refer back to the main
document for help balancing tires.
Spoked wheels need to be trued from time to time ... if you know how
to do it, you can measure the runout as described in
the main document, and adjust
the spokes as necessary. Even if you don't know how to true the wheels,
you can spin the wheel and let the spokes bounce off a screwdriver to
see if any of them sounds different. Different-sounding spokes are
probably too loose or too tight.
|
|
|
<<back
to the main document>>
|
|